When disaster strikes and your roof suffers damage, understanding how to navigate the roof insurance claim process can be crucial. This comprehensive guide will walk you through each step, from assessing the damage to receiving the final payout. By the end of this article, you’ll be well-equipped to handle the complexities of filing a roof insurance claim, ensuring you get the coverage you deserve. In this blog:
- Understanding your insurance policy
- 3 steps to assessing the damage
- Reporting the claim
- The inspection process
- Reviewing the estimate
- Receiving the payout
- Repairing your roof
- Closing the claim
- Common challenges and tips
🤔 Understanding Your Insurance Policy
Before filing a roof insurance claim, it’s essential to thoroughly understand your insurance policy. Knowing what is covered, the extent of the coverage, and any exclusions can help you navigate the claims process with confidence and clarity.
- Review Your Coverage: The first step in any roof insurance claim process is to understand your insurance policy. Familiarize yourself with the specific details, including:
- Coverage Limits: Know the maximum amount your insurance company will pay for roof repairs or replacement.
- Exclusions: Identify what types of damage are not covered. Common exclusions include wear and tear, poor maintenance, and damage due to pests.
- Deductibles: Be aware of the amount you must pay out-of-pocket before insurance kicks in.
- Endorsements or Riders: Check for any additional coverages or special clauses that might affect your claim.
- Contact Your Insurance Agent: If you have any questions or need clarification, reach out to your insurance agent. They can help explain the nuances of your policy and what you can expect in terms of coverage.
💡 3 Steps To Assessing the Damage
Assessing roof damage promptly is crucial in preventing long-term issues and costly repairs. In this section, we will outline a straightforward three-step process to help you evaluate the condition of your roof efficiently.
1. Immediate Steps Post-Damage
After a storm or other damaging event, it’s important to assess the condition of your roof as soon as it is safe to do so:
- Visual Inspection: From the ground, look for obvious signs of damage such as missing shingles, visible holes, or sagging sections.
- Interior Check: Look for signs of leaks or water damage inside your home, particularly in the attic.
2. Document the Damage
Documenting the damage is critical for your insurance claim. Here’s how to do it effectively:
- Photographs and Videos: Take clear, comprehensive photos and videos of all damage. Capture wide shots and close-ups from multiple angles.
- Written Notes: Keep detailed notes on the extent of the damage, including any visible structural issues and areas where water has penetrated.
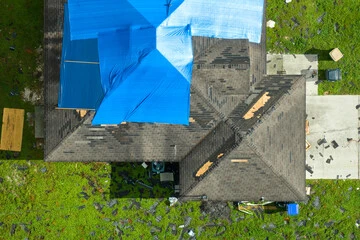
3. Temporary Repairs
To prevent further damage, you may need to make temporary repairs. For example, use tarps to cover exposed areas. Keep all receipts for any materials purchased, as these can be reimbursed by your insurance company.
📄 Reporting the Claim
Once you’ve assessed the damage and reviewed your insurance policy, the next step is to report the claim to your insurance provider. Timely and accurate reporting is key to ensuring a smooth and efficient claims process.
- Notify Your Insurance Company: Report the damage to your insurance company as soon as possible. Most companies have a specific timeframe within which you must file a claim, often ranging from 30 to 60 days after the event.
- Provide Detailed Information: When filing your claim, be prepared to provide:
- Your policy number.
- Date and time of the incident.
- Detailed description of the damage.
- Any photos, videos, and notes you have taken.
- Claim Forms and Paperwork: Your insurer will likely send you forms to fill out. Complete these promptly and accurately. The quicker you submit all necessary documentation, the sooner your claim can be processed.
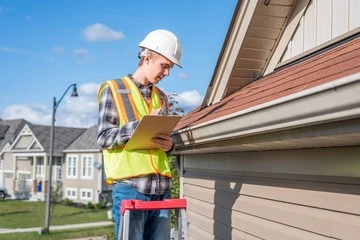
🔎 The Inspection Process
A thorough roof inspection is a critical step in identifying potential issues before they escalate into significant problems. This process involves a detailed examination of your roof’s condition, helping you make informed decisions about necessary repairs or replacements.
- Insurance Adjuster Visit: Once your claim is filed, an insurance adjuster will be assigned to inspect the damage. Here’s what to expect:
- Schedule the Inspection: Coordinate with the adjuster to find a suitable time for their visit. Be present during the inspection if possible.
- Prepare Your Documentation: Have all your photos, videos, notes, and any receipts for temporary repairs ready for review.
- Walkthrough: Accompany the adjuster during their inspection, pointing out all areas of damage and providing any additional context they might need.
- Independent Contractor Assessment: Consider hiring an independent roofing contractor to assess the damage before or during the adjuster’s visit. This can provide a second opinion and help ensure nothing is missed.
💵 Reviewing the Estimate
Carefully reviewing the estimate provided by your contractor is essential to ensure all necessary repairs and costs are accounted for. Paying close attention to the details can help you avoid unexpected expenses and ensure the work is completed to your satisfaction.
- Adjuster’s Report: After the inspection, the adjuster will compile a report detailing their findings and an estimate for the cost of repairs or replacement. This report will be sent to your insurance company.
- Contractor’s Estimate: If you had an independent contractor assess the damage, compare their estimate with the adjuster’s report. Any significant discrepancies should be addressed with your insurance company.
- Negotiation: If you disagree with the adjuster’s assessment or the proposed payout, you can negotiate. Provide evidence supporting your case, such as the contractor’s estimate or additional documentation of the damage.
💰 Receiving the Payout
Once your roof insurance claim has been approved, it’s essential to understand the process of receiving your payout. This section will guide you through the steps required to ensure you get the compensation you need to restore your roof effectively.
- Types of Payouts: Insurance companies typically offer two types of payouts:
- Actual Cash Value (ACV): This payout considers depreciation, so you may receive less than the cost to replace your roof.
- Replacement Cost Value (RCV): This payout covers the full cost to replace your roof, minus your deductible.
- Initial and Final Payments: In some cases, you may receive an initial payment to start repairs and a final payment upon completion. Ensure you understand the payment structure and any conditions attached to receiving the full payout.
- Mortgage Company Involvement: If you have a mortgage, your lender may be listed on the insurance checks. You’ll need to work with them to endorse the checks and may have to meet certain requirements before funds are released.
🏚️ Repairing Your Roof
After receiving your payout, the next step is to focus on repairing your roof to restore its functionality and appearance. This section will provide you with essential tips and expert advice to ensure your roof repairs are done efficiently and effectively.
- Hiring a Contractor: Choose a reputable roofing contractor with experience handling insurance claims. Verify their credentials, read reviews, and ask for references. Make sure they are licensed and insured.
- Contract and Timeline: Sign a contract outlining the scope of work, materials to be used, and the project timeline. Ensure the contractor obtains any necessary permits before starting work.
- Monitoring the Work: Stay involved throughout the repair process. Regularly check in with your contractor to ensure work is progressing as planned and address any issues promptly.
- Final Inspection: Once repairs are complete, conduct a final inspection with your contractor to ensure all work meets your satisfaction. Confirm that any necessary inspections by local authorities have been passed.
✅ Closing the Claim
Successfully closing your roof insurance claim ensures that all necessary repairs are completed and all financial matters are settled. This section will guide you through the final steps to officially close your claim, ensuring everything is properly documented and resolved.
- Finalize Paperwork: Complete any remaining paperwork required by your insurance company. This may include proof of repairs or additional documentation.
- Keep Records: Maintain thorough records of all communications, documents, and receipts related to your claim. This can be invaluable if any issues arise later.
- Evaluate Your Experience: Reflect on the claim process and consider any lessons learned. This can help you better prepare for future claims and ensure you have the right coverage in place.
❗️ Common Challenges and Tips
Managing roof repairs and maintenance can come with a variety of challenges, from unexpected weather conditions to finding the right materials. In this section, we will identify common issues homeowners face and provide practical tips to help you address them effectively.
- Delayed Response from Insurer: If your insurance company is slow to respond, follow up regularly and document all interactions. Consider contacting your state insurance department if delays become excessive.
- Disputes Over Payout Amount: If you and your insurer cannot agree on the payout amount, you may need to engage in mediation or arbitration. In some cases, hiring a public adjuster or attorney may be necessary.
- Preventative Measures: To minimize future roof damage and streamline potential claims, take preventative measures:
- Regular Maintenance: Conduct routine inspections and maintenance to keep your roof in good condition.
- Upgraded Materials: Consider using higher-quality, more durable roofing materials.
- Insurance Review: Regularly review your insurance policy to ensure it meets your needs and provides adequate coverage.
🙌 Expert Guidance and Support from Monarch Roofing
Filing a roof insurance claim can be daunting, but with the right guidance, you can navigate it effectively. From understanding your policy to completing repairs, this comprehensive roadmap helps you manage your claim successfully. By staying organized, communicating effectively, and being proactive, you can ensure you receive the compensation you deserve and restore your home.
At Monarch Roofing, our team of experts is here to support you every step of the way. With years of experience and a dedication to excellence, you can trust us with all your roofing needs. Contact us today to see how we can help!


