Installing a metal roof can be a rewarding project, offering durability, energy efficiency, and a sleek, modern look to your home. This comprehensive guide will take you through the process in seven detailed steps, ensuring a successful installation. Whether you’re a seasoned DIYer or tackling your first roofing project, these instructions will help you achieve professional results. In this blog, we’ll cover:
- The benefits of metal roofing
- 7 step guide to install metal roofing
✅ The Benefits of Metal Roofing for Modern Homes
Homeowners are turning to metal roofing for its exceptional durability and ability to withstand harsh weather conditions. Additionally, the energy efficiency and attractive design options make metal roofs a popular choice for modern homes.
- Exceptional Longevity: Metal roofs can last 40-70 years, significantly outlasting traditional asphalt shingles.
- High Durability: Capable of withstanding extreme weather conditions such as heavy rain, snow, and high winds, offering unparalleled protection for your home.
- Energy Efficiency: Reflect solar radiant heat, reducing cooling costs by up to 25%.
- Modern Aesthetic: Provides a sleek, contemporary look that enhances your home’s curb appeal.
- Environmental Friendliness: Often contains recycled materials and is fully recyclable at the end of its life.
💡 7 Step Guide To Install a Metal Roof
Installing a metal roof may seem daunting, but breaking the process down into manageable steps can make it much more approachable. Here are the seven steps to guide you through the installation of your new metal roof.
1. Prepare and Plan
- Assess Your Roof: Before you begin, carefully inspect your existing roof. Check for structural integrity, ensuring the decking is sound. Measure the roof’s dimensions to calculate the amount of metal roofing material you’ll need.
- Choose the Right Materials: Metal roofs come in various styles, including standing seam, corrugated panels, and metal shingles. Choose the type that best suits your aesthetic and functional needs. Ensure you also have the necessary underlayment, fasteners, and flashing materials.
- Gather Tools and Safety Equipment: You’ll need specific tools for metal roof installation, including:
- Tin snips or a metal shear
- Power drill with metal roofing screws
- Tape measure
- Chalk line
- Ladder
- Safety harness and gloves
- Roof jacks and planks for stability
- Check Local Building Codes: Ensure your installation complies with local building codes and regulations. Obtain any necessary permits before starting the project.
2. Remove the Old Roofing
- Tear Off Old Shingles: Using a roofing shovel or a similar tool, remove the existing shingles and underlayment. Work carefully to avoid damaging the roof decking.
- Inspect and Repair Decking: Once the old roofing is removed, inspect the roof decking for damage. Replace any rotten or weakened sections to provide a solid foundation for your new metal roof.
- Clean the Surface: Sweep the roof surface clean of debris, nails, and dust. A clean surface ensures proper adhesion of the new underlayment and roofing materials.
3. Install the Underlayment
- Choose the Right Underlayment: A high-quality underlayment is crucial for metal roofing. Synthetic underlayment is recommended for its durability and moisture resistance.
- Lay the Underlayment: Starting at the eaves, roll out the underlayment horizontally, ensuring it lays flat. Overlap each row by 4-6 inches and secure it with roofing nails or staples.
- Seal the Edges: Use roofing tape to seal the seams and edges of the underlayment. This additional layer of protection helps prevent moisture infiltration.
4. Install Flashing
- Install Eave Flashing: Begin with the eave flashing, securing it along the edge of the roof. Use roofing nails or screws to fix it in place, ensuring it overlaps the edge of the underlayment.
- Install Valley Flashing: If your roof has valleys, install valley flashing by laying it along the valleys and securing it with roofing nails. Ensure the flashing is centered and lays flat.
- Install Step Flashing: For areas where the roof meets walls or chimneys, install step flashing. This involves layering small pieces of flashing with each course of shingles, creating a water-tight barrier.
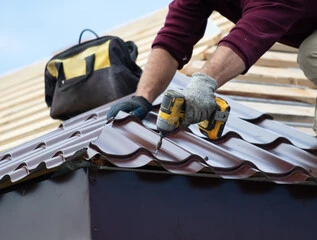
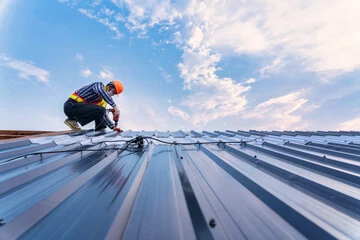
5. Install the Metal Panels
- Measure and Cut Panels: Measure the length of each roof section and cut the metal panels to size using tin snips or a metal shear. Wear safety gloves to protect your hands from sharp edges.
- Position the First Panel: Begin at the bottom corner of the roof, positioning the first panel with the edge overhanging the eave flashing by 1-2 inches. Ensure the panel is square to the roof edge.
- Secure the Panel: Using a power drill and metal roofing screws, secure the panel to the roof deck. Place screws every 12-18 inches along the panel’s ribs and at the eave and ridge. Be careful not to over tighten, as this can distort the metal.
- Continue Installing Panels: Continue installing panels, overlapping each one by at least one ridge or as specified by the manufacturer. Use a chalk line to ensure each panel is aligned correctly.
- Trim and Secure Panels: Trim panels to fit around vents, chimneys, and other roof penetrations. Use flashing to seal around these areas, ensuring they are watertight.
6. Install Ridge Caps and Trim
- Install Ridge Caps: Ridge caps cover the peak of the roof, providing a finished look and additional weather protection. Position the ridge cap over the peak, ensuring it overlaps the top edges of the metal panels.
- Secure Ridge Caps: Using metal roofing screws, secure the ridge caps to the roof. Ensure the screws penetrate the underlying panels to hold the ridge cap firmly in place.
- Install Edge Trim: Install edge trim along the gable ends of the roof. This trim helps protect the edges of the metal panels and provides a clean, finished look. Secure the trim with metal roofing screws.
7. Final Inspection and Cleanup
- Inspect Your Work: Thoroughly inspect your new metal roof, checking for any loose screws, misaligned panels, or gaps in the flashing. Ensure all areas are secure and watertight.
- Clean Up the Site: Remove any debris, old roofing materials, and tools from the roof and surrounding area. Safely dispose of old shingles and other waste materials.
- Perform Maintenance Checks: To ensure the longevity of your metal roof, perform regular maintenance checks. Clear debris from the roof, gutters, and downspouts, and inspect for any signs of damage or wear.
🙌 Expert Metal Roofing from Monarch Roofing
Installing a metal roof is a challenging but rewarding project that can greatly enhance the durability, energy efficiency, and aesthetics of your home. However, achieving a professional-quality installation requires expertise and precision. That’s where our team at Monarch Roofing comes in. With years of experience and a commitment to excellence, we ensure that your roofing project is completed with the highest standards of safety and craftsmanship. Trust Monarch Roofing to protect your home for decades to come. Contact us today for a consultation and let the experts handle your roofing needs. Happy roofing!


